Import of existing content (part 1) – a blessing or recipe for chaos?
One major point of the implementation of an architecture tool is the import of existing content. Organizations have years and sometimes decades of content in various formats available, that might be in various statuses – from “current” to “horribly incorrect”, “cannot be found anymore”, or “outdated”.
However, it might be a worthwhile exercise to get your new program started by bringing in content that your users and stakeholders already know. This will not only add meaningful content and might act as an accelerator for future projects, but also creates trust in your new repository when users interact with it for the first time.
In this article I will walk you through an approach that has been proven to be successful in multiple import projects that included dozens and hundreds of models and other input documents. In the “how-to / import content” part I will focus on the import of models (in Visio, *.bpmn, ArchiMate, or other formats).
This is part 1 of a 2-part series, which will be continued in the next blog post.
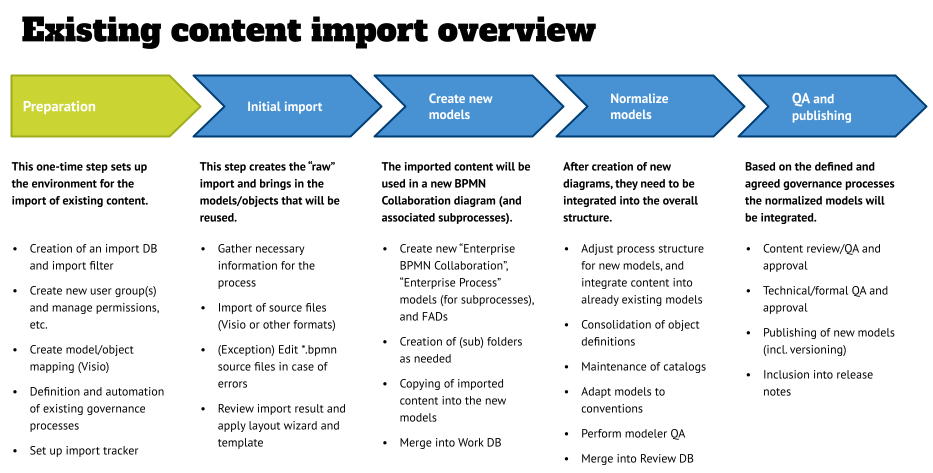
Content import overview
Importing content is straightforward, but also a process with a lot of moving parts in the air. Therefore, it is important to not lose track of where each individual model is in its journey.
The graphic below shows the process in an overview, and it assumes that you already have a database structure in place that includes a hierarchy of items. In this article I am using the import of process models (BPMN models to be more precise) as an example, and show steps aligned to the architecture tool that I am using – ARIS. Depending on your chosen tool, some of the steps might be slightly different.
Please also note, that I am only covering the import of existing models, not the import from Excel, a database, or another source system using the tools’ APIs. The steps are similar, but it would take significant more details to explain those, and would “muddy the waters” of the “import an existing model” use case.

The process is comprised or five steps:
- Preparation: This is a one-time step that sets up your environment for the import of the existing content.
- Initial import: This step brings in the “raw” import and brings in the models/objects that will be reused.
- Creation of new models: This might be a BPMN-specific step because of the implementation of BPMN in different tools and the export “flavor” of the source system.
- Normalization: In this step the imported models will be integrated into predefined structures, and catalogs will be maintained.
- QA and Publishing: The last step covers the various quality assurance and approval steps to finalize the import and make the content available for end users.
Phase 1 – Preparation
The first exercise is to create a catalog of to-be imported content. Ideally you do this in a database that will be the “source of truth” through the complete import project, and also supports the estimation of efforts that will help with prioritization of the import sequence, or determine which models will be imported and which ones not (we are big fans of Notion over here are What’s Your Baseline, so you might want to have a look at this tool).
When creating this overview, I recommend to involve as many people as you can – stakeholders, business unit leaders, project managers, architects, and start with a loose collection of ideas and content. This shall be oriented on the goals of your organization (and yours, as defined in the Strategy phase of your implementation), and the objective is to get a rough overview of “what is out there” and what the volume of this content is.
Your stakeholders can be used as multiplicators/communicators and can open doors to people in your organization that you had no idea that they existed, or that they have worked on projects that are relevant for your effort.
Once you’ve created a rough overview, align the models to your priorities and initiatives, and determine an initial prioritization and sequence for import. Discuss this initial version with your stakeholders and get an agreement on which content shall be imported first.
From what I’ve seen in the past, everything that is regulations/SOX-related is a good candidate, as well as existing taxonomies in the various architecture views (not only in processes, even though the examples in this article will focus on process models).
After you have created the initial overview it is time to discover the details of your to-be-imported content. This includes descriptions, complexity, source file format, hierarchy level, (process) area, owner, (modeler) contact, assigned modeler (importer), and the planned import batch.
Especially the complexity will be important to estimate the effort. My recommendation is to keep this simple and just count the number of objects that need to be imported, and then come up with a simple rule that defines low/medium/high complexity (20/50/50+ is a good start). Also keep in mind that the source file might include multiple models (tabs in Visios for example), and that those are counted as individual models.
The next step is to set up your database structure and create an import filter. As shown in the graphic below, you want a separate (logical) database to do the initial/”raw” import of the source files. In many cases these include content that you do not want to have in your governed DB setup (in the gray box below), and you also might need elevated permissions or a special method filter for the import that is different than the standard filter you are using in your day-to-day work.
An example for this might be that you are using the “Enterprise” BPMN model types for your regular modeling, because you want to take advantage of the ability to use dedicated org/role/app lanes in your collaboration diagrams. When importing *.bpmn files from another system these are not known in the technical file format (because the specification does not specify these, but is rather “foggy” in describing what lanes are). Therefore ARIS will import all *.bpmn files as standard BPMN Process Diagrams. The lanes in those won’t be reused in the later “create new models” step and therefore should not go into the Work DB where the normalization happens.

Once you have merged the content into the Work DB -before the normalization step (see part 2 of this series)- the models in the Import DB can be discarded. A good practice is to have a “clean” Import DB before the next batch of models is ready for import.
Next, you might have to create a mapping if the source files require it (Visio for example). This step is not required for every source file type (e.g. BPMN, ArchiMate, DMN) because they have a technical format defined, and tool vendors take this and create out-of-the-box imports for these formats.
In case of Visio, you would have to map the Visio stencil to a model type, map the shapes to object types, and map the attributes of the source shapes to model and object attributes. Obviously the more consistent things were created in Visio, the less effort is needed for the mapping – if things are all over the place, you might want to ask the question if the better way would be to use the Visios as an input for a manual creation, because the preparation of each import, and the cleanup after the initial input might be more than a manual recreation.
The last step in this phase is to determine and implement automation opportunities. Some architecture tools allow you to create workflows, or other automation means (scripts, macros, etc.) to trigger activities that can make things easier in the overall process. The obvious use case it the release cycle management shown in the gray box above, but there are also smaller automation opportunities, such as merging of content between database, triggering semantic checks, or locking/unlocking models if they reach a certain status in the import process.
Phase 2 – Initial import
In this phase the “raw” import will be done, and this is the step that you will see in the vendor demos when the topic of import comes up.
The steps in this phase are:
- Gather information – besides getting the source file that is to be imported, try to get as much information about the process as you can get. This can be related documents (such as risk documentation, process manuals, SOPs, or policy documents) and -as a minimum- a graphic of the existing model, so that you can lay out the imported content for the initial review accordingly.
Also get the contact information of the modeler of the existing model, and their availability. And lastly, enquire about the age of the content – it might be horribly outdated, and that could take this model off the list. - Create folder structure – in the Import DB I recommend to create a folder for each to-be-imported model, and then create two subfolders: “raw import” and “edited model”. The first one will be used for the technical import, while the second will be used in the next phase.
- Import source file – in this step you perform the import steps as needed for your tool. In the case of a BPMN import, unzip the *. bpmn file and look for the “main” process (there could be many in that file, and also *.bpmn files that you don’t need, such as “resources” or “glossary”). This main process will become a BPMN Collaboration diagram later, while the others will be BPMN Process diagrams, as they are subprocesses.
Import each individual file from the Zip into their own folder. - Edit source file – depending on your architecture tool, it might perform a check on the to-be-imported file, and give you a warning (what might not be importable), or an error in case the code is not correct. In the latter case it most likely will tell you in which line the error resides – open the *.bpmn file in your text editor, and delete the corresponding tag (from <xyz> to </xyz>) and try the import again.
In most cases I was successful with this, and the reason for that behavior is that the various tools have their own interpretation of the technical spec, and add custom tags to the code that just their tool understand (and needs). Typically this does not create any unwanted issues, but be prepared that you might have to do this a couple of times for a file, or you end up in a dependency nightmare – in these cases it might be easier to simply create the model in your architecture tool “by hand”, - Review the imported file and do some initial formatting – the tools are getting better in their imports, but sometimes the X and Y coordinate information might be lost, and you will receive an imported model as shown below. In these cases I recommend to do these three steps:
- Select all objects and set their representation to the tool’s default (e.g. size of objects).
- Apply the template for visual representation of your model.
- Use the layout wizard to let the tool determine the best layout that the algorithm can do.

After you’ve imported the models, you might want to do additional “pixel pushing” to give the model a more user-friendly layout, and also correct immediate errors that might stick out. In the screenshot above, for example, all events were imported as either intermediate or end events, but no start events. Go through your model, and change the symbols of the event objects as needed (the graphic from the source file will help you determine this).
Conclusion and outlook
Up to this point we accomplished what the tool vendors show as “easy-peasy” content import, and their claims that the tools can import source content is correct.
In part 2 of this series, we will cover the next three steps – create new models, normalization, QA and publishing – that are needed once you have completed the “raw” import, and we’ll discuss the integration into a governance process.
Roland Woldt is a well-rounded executive with 25+ years of Business Transformation consulting and software development/system implementation experience, in addition to leadership positions within the German Armed Forces (11 years).
He has worked as Team Lead, Engagement/Program Manager, and Enterprise/Solution Architect for many projects. Within these projects, he was responsible for the full project life cycle, from shaping a solution and selling it, to setting up a methodological approach through design, implementation, and testing, up to the rollout of solutions.
In addition to this, Roland has managed consulting offerings during their lifecycle from the definition, delivery to update, and had revenue responsibility for them.
Roland is the VP of Global Consulting at iGrafx, and has worked as the Head of Software AG’s Global Process Mining CoE, as Director in KPMG’s Advisory, and had other leadership positions at Software AG/IDS Scheer and Accenture. Before that, he served as an active-duty and reserve officer in the German Armed Forces.