Model import into your architecture tool (part 2)
As mentioned in part 1 of this series, a model import as part of the implementation of an architecture tool can be a crucial success factor to get a new program off the ground and act as an accelerator for future projects.
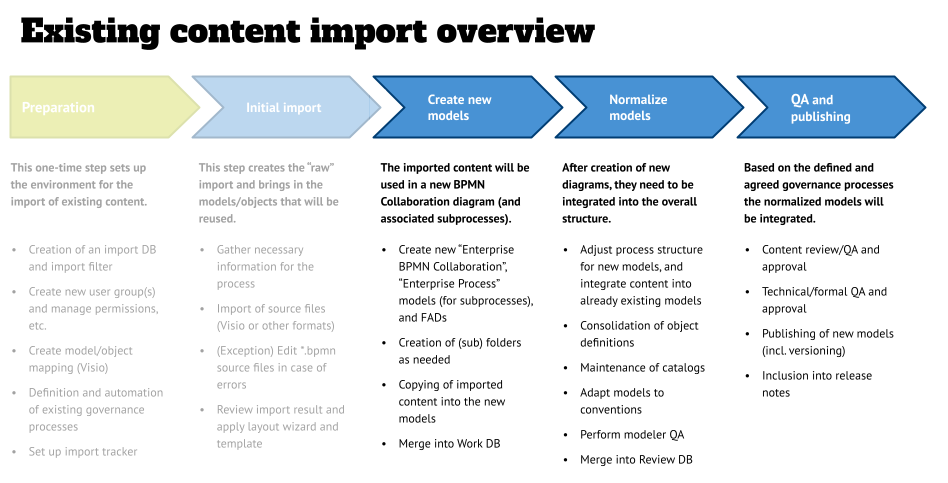
We discussed the first two phases (preparation and initial import) and will have a look at final three phases:
- Creation of new models: This might be a BPMN-specific step because of the implementation of BPMN in different tools and the export “flavor” of the source system.
- Normalization: In this step the imported models will be integrated into predefined structures, and catalogs will be maintained.
- QA and Publishing: The last step covers the various quality assurance and approval steps to finalize the import and make the content available for end users.

Phase 3 – Create new models
This phase is most likely specific for our example here, because we are looking at BPMN process models and the limitations of the specification, which in some areas does a not-so-stellar job in specifying things (for example when it comes to the use of lanes).
Up to now we have worked in the “raw import” folder for your models in the Import DB. We have identified the main process that is captured in the *.bpmn file, and imported it – and all additional processes that might be included as subprocesses – as standard BPMN Process Diagrams.
This typically is not enough for a real-world BPMN project – the main process needs to be a BPMN Collaboration Diagram, and the subprocesses need to be BPMN Process Diagrams according to the specification. In addition to this, most clients want to have a semantic used for their lanes (roles, org units, apps, etc.) and for this different model types are used (“Enterprise BPMN Collaboration Diagram” and “Enterprise BPMN Process Diagram”).
The steps in this phase are:
- Create new “Enterprise” models: this step literally means to create the correct Enterprise BPMN model (type), and copy the objects from the raw import into them. Then compare this with the graphic and add missing objects that might not have been imported, or were of the wrong type, to the model.
Also capture (in a separate file or your tracker) incorrect modeling that you had to correct (some tools, for example, allow to stretch subprocess objects over multiple lanes which is not correct according to the spec), and maintain model attributes, such as name, description, status, contact, etc. - Create subfolders and models as needed – repeat the previous step for each subprocess. This will create a correct folder structure in your tool’s Explorer view and will finding and moving catalog items into their correct locations easier in the Work DB later.
- Merge into Work DB. Now that you have created the model as good as possible in the Import DB, it is time to merge the result from the “edited model” to the Work DB. The procedure for this might be different in your tool, but I recommend to create a high-level “import” folder in your Import DB, and move the new models with their objects into that high-level folder.
This will avoid that objects are all over the place once the merge into the Work DB has been done. You might have to coordinate with your administrator on this step in case you do not have the “Database Management” function privilege to do the actual merge.
After the merge is complete, the models in the Import DB are not relevant anymore and can be deleted to create a blank slate for the next batch of imports.
Phase 4 – Normalization
This phase drives the effort in a model import project – it will integrate the individual models into the existing structure/hierarchy of your Work database and is a mix of conversations, model adjustments, and admin tasks.
Before you begin to normalize your models, I suggest that you do an update from upstream systems (in case you have created interfaces to other “systems of truth” as part of your architecture tool implementation). This will ensure that you have the latest and greatest objects in your catalogs, and you don’t run into the situation that you see gaps, which might lead to delays if you have to contact the upstream system owners to ask for what the correct object will be – for example applications, or risks.
Typically, these updates are scheduled (e.g., once a week), but I recommend to ask for an extra update and wait for the notice from your admin that the import was successful.

After the update from upstream systems the steps in this phase are as follows:
- Integrate your new model into the structure and adjust other models as needed – this means a couple of things and opens a couple of questions.
- Is your new model a “standalone” model that already has a place identified, so that your BPMN Collaboration Diagram will be a full lower-level model? Or does it contain content that needs to be split over multiple existing models, because it was an “End-to-End” (-ish) diagram that covered aspects of various, already existing models? In that case the elements of your process need to be integrated into the already existing models, and there will be no separate new model.
Before you do this, you might want to not only consult with the other owners of the existing models in the Work DB, but also with your model contact from whom you have received the source file that was to be imported. Get agreement from all affected people and escalate if you cannot reach that agreement. - What about your subprocesses? Are they really a subprocess of this process, or do they already exist in the database? If so, are they also “main” models, which would mean that you will have to create process interfaces between these processes, or do they exist as subprocess models (BPMN Process Diagrams) elsewhere? In that case, you would have to update the BPMN Process Diagram and bring the end events “up” into the main lower-level collaboration diagram (remember: BPMN has a specific way how to do this correctly).
In every case you will have to contact the owner/modeler of the other models and agree with them how to model things. For example, on a process interface the end event of an upstream process is the start event of the downstream process, and it should be the same object in your database. If you cannot agree on a specific name, the golden rule is that the upstream process determines the name of the end events. - Check if you have workarounds in your meta model as shown in the graphic above. Even if this is just a temporary convention, you might have to create higher-level models and then assign your new model to one of those objects (in the example above, the structure in case B was not granular enough and therefore a “Level 3.5” Function Tree had to be maintained that included the detailed variations of the L3 process).
An example could be that the taxonomy just defined a process called “Create account” – now you have to define which types of accounts and the different ways to create this. This could lead to L3.5 objects named “Create Credit Card Account – Branch”, “Create Credit Card Account – Online”, “Create Credit Card Account – Telephone”, “Create Mortgage Account – Branch”, and “Create Mortgage Account – Online”. Your new collaboration diagram would then be assigned to one of the five objects.
- Is your new model a “standalone” model that already has a place identified, so that your BPMN Collaboration Diagram will be a full lower-level model? Or does it contain content that needs to be split over multiple existing models, because it was an “End-to-End” (-ish) diagram that covered aspects of various, already existing models? In that case the elements of your process need to be integrated into the already existing models, and there will be no separate new model.
- Once you have integrated your new model into the correct place in the structure, you need to work with an admin to consolidate objects. Since your new model did not have an ID for each object that your architecture tool recognizes, new objects were created, which leads to the situation that you have multiple objects with the same name.
To solve this situation you need to reach out to the object owners and determine with them if you *really* mean the same thing and it is an object, for example a process step or event, that shall be reused. Typically that means that the step uses the same systems, data, is done by the same role, and has the same attributes (e.g., the definition) – if that is not the case you have a new object, which name should be different.
In case you agree that it is the same object, work with your admin to do the consolidation. Good architecture tools have a feature that does this in an admin view, which will then replace all objects that need to be replaced with the already existing object in the background, so that there is no need to open each model and make the changes manually. This background step will also delete the to-be consolidated objects from the database, so that you don’t have any “Zombie objects” in your database that would spoil a future analysis. - The next step is to adapt your model(s) to the project standards and conventions. This might change the layout significantly from what you have received as model graphic from the source system, but typically those models were created “in the wild” without any constraints, and therefore might not follow any of the standards that are defined in your program. It might be a good idea to take some notes of what you’ve changed for the upcoming review with the owner of the source model, so that you can explain why you made the changes.
Also note down things in your current conventions that forced you to do “interesting modeling constructs” when adapting the models, and submit those to the method owners as improvement suggestions for the next version of your standards and conventions. - After you have adapted your model(s) in the Work DB, schedule a meeting with the original model author/contact person, and walk them through the new models. Capture their improvement ideas and get their buy-in, so that you can close out the content modeling after the next iteration. Avoid having an unlimited number of iterations and reviews, but set the expectation that you have only one or two iterations.
If your model contact does not agree with the normalized models after the maximum number of iterations, escalate the situation – these iterations can be significant time drains, and might bring the whole import project into a risky state. - The last step in this phase now is to do a modeler QA on your model. Your project should have a checklist as shown in the graphic below, that includes a mix of visual inspections (“is the happy path clearly visible?”), semantic checks (“was it modeled correctly according to the notation standards?”), and reports.
You also might be triggered to maintain model attributes that will help with the QA and publishing activities in the next phase.

Phase 5 – Quality assurance, publishing and regular certification
The last phase of the model import contains the formal approval process and various merges, versioning and publishing.
The first step in this phase is the submission to QA review. Even though it sounds trivial, I suggest to automate this whole phase with a workflow engine that your architecture tool should have. This will take out the minutiae of locking/unlocking the model in the Work DB, check of mandatory attributes, capturing of timestamps for reporting, and merge of a submitted model into the Review DB, where stakeholders will do their reviews.
Another benefit of using a workflow engine is that stakeholders will be notified when their contribution is needed, and they will have a task list that they can work from (and either do the task, using a custom GUI, or delegate the task to someone else if needed). Lastly, the workflow engine can provide reports and dashboards that show where the individual models are in the workflow at any given time – a feature that project management will love.
Typically you see three types of review, and I recommend to do these in this sequence in the Review DB:
- Content review – this is done by a stakeholder from the line of business, who might or might not be the original author of the source model that was imported. These stakeholders are most likely not interested in the details of your modeling conventions, but are interested in the content correctness of the model.
This might lead to conversation needs where you, as the modeler, might have to explain why things are modeled in a certain way, and why a convention exists.
Use the collaboration features of your architecture tool (commenting and “@ tagging” for notifications) instead of rejecting the whole model in case you, as the reviewer, are not in agreement or do not understand what is presented to you. A rejection will “reverse” the whole submission and force a new submission for approval. This will cost precious time. - Risk review – this might be a step that will not apply to all models, and therefore you should have a checkbox on the submission for approval form that will trigger a risk review (“SOX-relevant” or similar).
The risk reviewer will most likely act similar to the content reviewer, even though their focus of the review is different than the first review – e.g. “are the correct risks and controls included in the model?”. - Technical QA – the last step in the review is a formal QA, and is typically done by a central team that ensures that the standards and conventions are used. To do this, these reviewers might use a similar checklist as was used for the modeler QA above, but in addition to the formal aspects, the focus here is to review the integration of the model into the overall structure (correct interface modeling on all levels, not only on the lower level, correct consolidation, usage – and potential consolidation – of catalog objects, etc.).
If any of these reviews fails, the process will be sent back to the modeler with a list if items for correction, and all technical steps in the workflow will be reversed (unlocking of model in Work DB, deletion of model in Review DB, notification of all people involved about rejection, etc.). The model then will be re-submitted after the corrections are done, and it needs to be defined in the workflow if all three review steps need to be done again, or if existing prior approvals are still valid and a later reviewer will be triggered.
In case of the successful approval, the fully approved model will be versioned, the model status being set to “released” and it will be merged into the Master DB for consumption by all viewers in the organization, as well into the Work DB, so that the next iteration of this model starts with the identical model that exists in the Master DB.

As shown in the graphic above there might be another use case for the approval process that was explained in this section – the regular certification of models. Even though a lot of steps are identical to the “regular” approval process, there are additional steps needed – for example the assembly of “review batches” of models, the management and reporting on the certification process, and the certification itself.
I recommend to define this as separate governance process and implement a separate workflow in your automation component of your architecture tool for this purpose. A detailed description of the certification process is out of scope for this article for that reason.
Model import conclusion
After going through all five phases of the model import process that were described in these two articles, you have successfully imported and integrated the new content, and also published it while getting approval from all stakeholders.
From now on the imported processes will follow the established governance, and the source files should be deleted, so that no new changes will be done to them – a tempting idea for some people who don’t like to “do the overhead” that might come with working in a central repository. I suggest that you discourage this practice and simply ignore if someone shows up with “their version” of an existing model … easier said, than done (depending on who that person is), but be assured that in the long run you will be better off to insist on the consistency of the repository.
Bonus offer
A major takeaway from the process shown above is to keep track of all the moving parts when importing dozens or more models. A tool that is very good at managing this (and other things) is Notion. We are big fans of this tool for organizing and preparing our podcast, and it is affordable – free for personal use (one owner, and you can invite guests for edits) or working in a team.
The tracker covers not only all phases of the import process (catalog, tracking each model through the defined process in Kanban boards, and reporting), but also includes additional information on how to do this. It also includes a presentation with detailed step information and examples from a large import project.
You can find the tracker here: https://whatsyourbaseline.gumroad.com/l/importtracker.
Roland Woldt is a well-rounded executive with 25+ years of Business Transformation consulting and software development/system implementation experience, in addition to leadership positions within the German Armed Forces (11 years).
He has worked as Team Lead, Engagement/Program Manager, and Enterprise/Solution Architect for many projects. Within these projects, he was responsible for the full project life cycle, from shaping a solution and selling it, to setting up a methodological approach through design, implementation, and testing, up to the rollout of solutions.
In addition to this, Roland has managed consulting offerings during their lifecycle from the definition, delivery to update, and had revenue responsibility for them.
Roland is the VP of Global Consulting at iGrafx, and has worked as the Head of Software AG’s Global Process Mining CoE, as Director in KPMG’s Advisory, and had other leadership positions at Software AG/IDS Scheer and Accenture. Before that, he served as an active-duty and reserve officer in the German Armed Forces.