How to set up the Technical Governance – part 3: creating the architecture method configuration
After doing the “hard work” of figuring out what shall be captured and visualized in your architecture tool – manifested in the data model and meta model – it is now time to do the actual architecture method configuration of the tool. For this purpose I will describe this for ARIS. Your chosen tool might differ in the detailed steps, even though the major steps most likely will be the same.
Also, please do not see this as a detailed “where to click” guidance. For that I recommend that you attend a training either by Software AG or your consultants of choice. This article will give you the overview what to look for and leading practices when working with the ARIS method configuration.
Architecture method configuration process
There are three different types of “products” you will have to manage in ARIS (your configuration files): the method configuration file (the “filter“), the template that defines the look-and-feel of the models, and the configuration set of the Portal (ARIS Connect).
We will discuss the approach below, but keep in mind that you should treat these artifacts like you treat customer products – they have their own lifecycle (i.e. version them), and you should never make configuration changes in your production environment. Rather have a setup that includes at minimum a development environment, a test environment -which you can use for training purposes as well- and your production environment. Please note, that the lower environments might or might not have the same (logical) database structure as the production environment.
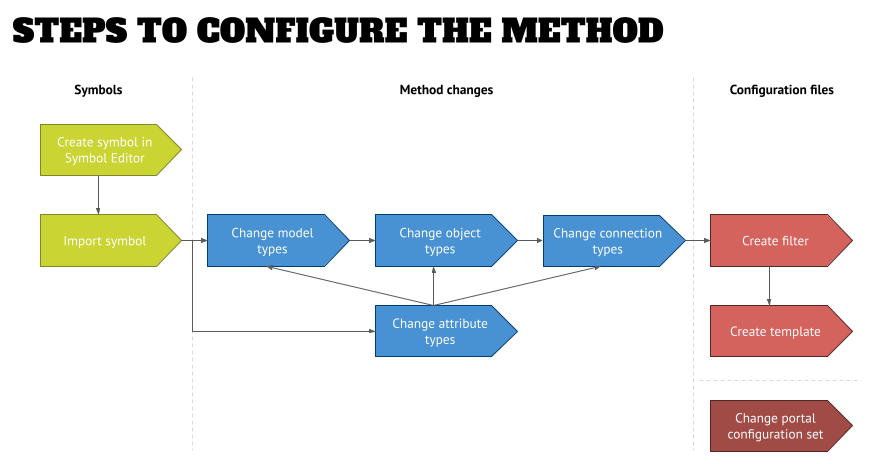
The architecture method configuration process is as follows:

This process is accompanied by additional activities such as check and updated of scripts (reports and semantic checks), documentation, and packaging for deployment.
For all the steps except the last one (Change portal configuration set) you will need the ARIS Architect download client at the time of this writing, even though parts of the method configuration are also available in ARIS Connect’s administration, and I expect to have everything on the website within the next few releases. The portal configuration will be done completely on the ARIS Connect website.
Create and import symbols
ARIS ships with many different symbols and you can create your own symbols or change existing ones in ARIS Symbol Editor – you will find the symbol editor in the “ARIS” menu of Architect. Adding a new or changed symbol to your configuration is comprised of two steps – create the symbol and import the symbol.
Create/change symbol
Within the symbol editor you will find all tools to create or change a symbol, and you can get started right away if you have worked in similar tools before (PowerPoint for example).
However, one thing you need to understand is that the default symbols are a complex set of shapes and you need to be careful where to click to select the right part of the symbol. The graphic below shows how a symbol is constructed – it are all vector shapes, except the icon that is in the colored background vector – that is a bitmap graphic (the small flag in the graphic below). If you want to change that I recommend to create a bitmap and not try to do this within ARIS. Most likely you will run into scaling effects that make that small icon look bad (guess how I know…).

When you have created your own symbol play with the zoom and check if your new symbol looks good at 100% -75% and not only in the zoomed-in standard display of the symbol editor.
The second step is to create the small symbol for the display in the symbol toolbar and in the Explorer view. You can find this on the second tab of your symbol in symbol editor, and it typically used the small icon that is used in the main symbol (the flag in the example above).
Once you’re done, save your symbol as *.amf file in a location where you can find it quickly again for the next step. I typically use a descriptive name, such as “flag orange” in our example. When you create symbols for attributes, you might have to create variations of the same symbol, so you might also have a “flag blue” and a “flag gray” *.amf file to create to display the three states of a Boolean attribute (true, false, not maintained).
Import the symbol into your configuration
This step is pretty straightforward – you need to import your *.amf file into ARIS. You can do this under Administration > Configuration > Method. The one thing you need to decide is if your symbol is to be used as an object symbol (the large boxes in your model) or as an attribute symbol (small icons inside or around your main object symbol). Keep in mind that your attribute symbols are significantly smaller than the object symbols and you might have to go back to the symbol editor to change your *.amf files.
To import your symbol as an object symbol, just go to “Symbols” in your method area and right-click on the right hand pane and choose “import”. In the next dialog you can select your *.amf file. At this time give your symbol a “meaningful” name, such as “Business Capability Configuration” because that is the name that you will see for the object in the toolbar.
If you want to import your symbol as attribute symbol (a different section in the “Method” area), I recommend to look through your list of already existing attribute symbols and derive a new one from it (right-click on the existing attribute symbol). In the following dialog you can upload and name your new symbol. Typically I like to derive a new attribute symbol from the “Check Box” attribute symbol. Like with the object symbols, give your new symbol a “meaningful” name.
Changing the architecture method
The steps in this category are the actual changes in the configuration and encompass the change and creation of new “things” for attribute types, model types, object types, and connection types. You will also prepare the Configuration database to be able to cut a filter in the final high-level step.
From here on you can do the configuration in either Architect or directly in Connect. However, there are still some things not included in the Connect method configuration (as of the date of this writing), and therefore I will describe things as if you would use Architect.
Create attribute types
This is one of the more tedious aspects of the method configuration, and your lower-level data models will help you do this in a way that you don’t forget things:
- Create attribute type groups – even if those are not visible in Connect, the attributes will be sorted out in those groups (and are visible in Architect). This will help you to organize the attributes and avoids a super-long list of attributes when it comes to maintaining them. This is optional and recommended, but you can search for attributes in both tools in case you encounter a long list.
Having all custom attributes from an external system, for example, in its own attribute group will also help with the negotiations and the updates of the data models going forward. - Create new attributes/update existing attributes – when you create a new attribute keep in mind that you cannot change the attribute type (text, integer, boolean, value, etc.) after you created it. So you will have to recreate the attribute and then assign it to models, objects, and connections again (see the next steps below). Therefore it is important that you discuss that format in the data model conversations early on.
When you choose “Boolean” as attribute type you can not only define the values – true, false, not maintained – but you can also define which of the freshly imported attribute symbols shall represent the value if wanted (the actual definition if it shall show up as text or as the symbol will happen when editing the template below).
The graphic below shows an example of the data model, and you can easily see the custom attributes that needed to be created in this example for a technical interface (the 11 attributes to the right).

After you have made changes to the architecture method and want to check if they show up as an option in your “MM” models of your meta model, remember that you have to restart your Architect, because the method gets loaded when the tool starts. In Connect a restart is not needed.
Change the model types, object types, and connection types
The next step is to go into the other sections of the architecture method in the ARIS Administration and make the changes that you’ve determined in the data and meta modeling activities:
- Change the model types and derive new ones if needed.
- Change the object types as needed.
- Change the connection types as needed (renaming only as of the writing of this article).

Each dialog that you will see will have different options that vary depending on what type you edit. They all share the first page of the wizard and the attributes page, though. Keep in mind when you do this that there is a hierarchy and you make all changes in the context of a model (as the highest “method thing” in ARIS), which means that you can define a connection between two objects in one model type, while you do not allow a connection between the same objects in another model type for example.
The next step is to go to your Configuration database and maintain all model, object, and connection attributes in the objects that you’ve highlighted in your “MM” models, as well as the model attributes in the models that you created the Model Overview model for. Go back to the meta model article if you might have missed these two recommendations.
You don’t have to put any meaningful information into the attributes, a simple “x” is sufficient. It is important that you have an entry in the underlying database and it doesn’t matter what the content is. Also, click all Booleans, select a value from value attributes, enter time and currency attributes and so on, until you have all attributes that you’ve identified in your data models being maintained.
Update the configuration files
The first step in this section is to create a filter that includes the changes in the method. After that you will determine the look and feel of your models by editing the template. Lastly the configuration set of the ARIS portal needs to be configured.
Create a filter
Now that you have done all method changes in the backend it is time to create the filter. There are three ways of creating a filter:
- Use the filter wizard, which is a lengthy process that gives you control over every aspect what should be included in your filter.
- Create a filter from a database – this is the recommended way of creating filters, and the reason why I recommend the creation of a Configuration database.
- Merge of two filters to create a third one.
Now go and create a filter from the Configuration database (ARIS > Administration > Configuration > Filter). Give it a name and add a version number to the name. Use the description field to add a version history – I typically keep it simple and follow the standard “YYYY-MM-DD: [insert change descriptions or ‘initial filter creation’]”.
Then run the filter report (see below) on your new filter and see if all architecture method changes are included in the filter. If not, go back to the configuration database, or even back to the Method section in Administration to make the necessary changes. Update your filter and run the filter report again. This can be tedious work, but the fact that you can use Excel functionality like counting rows is very helpful (for example, when you want to check if all models have the same number of model attributes).

In some scenarios, it might not be sufficient to have a simple filter creation from the Config database. If you work with complex notations, such as BPMN, it might be a good idea to not include that notation in the “raw” filter, but rather copy the specialty filter that ARIS ships separately, and make changes in the copy using the filter wizard. Then merge both filters into a third filter.
One can make this as complicated as needed, and the graphic below shows the scenario that there is a default filter defined for the whole organization, while a project has additional needs (for example to include model types that are only of interest to them). In that case you would create an “Extension” database similar to your Configuration DB, cut a filter from that database, and merge it with the Standard filter into a Project filter.

Once you’re done with the filter creation, export all to a shared location, from which the testing team can pick the latest version for testing purposes (or you package it for them).
Change the template
The next step in the architecture method configuration is to change the look-and-feel. This is done by using a template in ARIS, and the steps are supported by a wizard that walks you through the various aspects of the visualization changes. Please note, that in the first step you need to select your final filter – the Standard and Project filters in the graphic above – as the method filter, so that you just see the objects and connections that are relevant. By default this is set to “Entire Method” whenever you call up the template wizard.
Also maintain a version number and version history on the first wizard screen, just as you did with the filter(s).
Once you have completed the template definition, you need to set the default template for your Connect users in Connect administration, and prepare a note for the Architect users how to change the template settings for new models under ARIS > Options. This note shall be included into the release notes that you will prepare later.
When you are done with changing the template also export it to the shared location where your exported filter waits for the testing team to pick it up.
Change the Connect configuration set
The last changes need to be made in the configuration set of the ARIS Connect portal. There are too many options to cover here, but you want to make sure that any renaming of model or object types will also be reflected in the config set, so that they are displayed correctly in the screens. You also might want to check if your changes – in the case of method extensions – require changes in the fact sheets and search user interface.
Unfortunately the filter and the portal configuration are not connected, because the target groups are different (viewers and standard modelers in Connect, and power user and admins in Architect), and the idea is to not confuse the viewers/standard modelers with too much jargon.
Export the configuration set to the shared location from above. When you’re done you have completed the technical architecture method configuration.
Final activities to close out the architecture method configuration
You are almost done. The steps below technically don’t belong to the architecture method configuration, but are “good development behavior” and you should follow them as well.
Update scripts
The last thing that you want to determine (and change if needed) are reports and semantic checks. The latter are meant to support users in correct modeling and your method changes might trigger “false negatives” if your scripts have not been updated. If you need to update those, don’t forget to also update the script documentation and prepare a guidance document how to replace the old scripts with new ones (and when to schedule them) for your IT administrators.
Additional documentation and activities
At this point it is time to document the changes that you did. Typically this will be done by creating a “Methods & Conventions” (M&C) document. This can be done with a regular Word or Google document, but I highly recommend to have this available in a Wiki, such as Notion, so that you can update and publish new versions of the documentation quickly.
In addition to the M&C document you also want to create release notes that complete the product package and can be used by the org change management team for communication purposes.
Test and deployment of configuration files
If your organization follows a more traditional, formal release process you also might want to package all configuration files, scripts, and documents in a zip file for sending it over to the test team and IT administrators.
The configuration files then need to go through testing in your test environment before they will be released into the production environment. Be prepared to give your testers and technical personnel some ‘hand-holding’ attention when they need to create their test scripts (“what is the expected behavior?”), conduct testing, and deploying into different environments.
In closing
This three-part series walked you through the major steps of changing the architecture method for your tool. It also included leading practices for design of the changes, and the high-level steps of doing the actual configuration activities in ARIS as an example. It also covered the auxiliary activities that are needed to follow IT development processes and enable testing and deployment of your changes.
Roland Woldt is a well-rounded executive with 25+ years of Business Transformation consulting and software development/system implementation experience, in addition to leadership positions within the German Armed Forces (11 years).
He has worked as Team Lead, Engagement/Program Manager, and Enterprise/Solution Architect for many projects. Within these projects, he was responsible for the full project life cycle, from shaping a solution and selling it, to setting up a methodological approach through design, implementation, and testing, up to the rollout of solutions.
In addition to this, Roland has managed consulting offerings during their lifecycle from the definition, delivery to update, and had revenue responsibility for them.
Roland has had many roles: VP of Global Consulting at iGrafx, Head of Software AG’s Global Process Mining CoE, Director in KPMG’s Advisory (running the EA offering for the US firm), and other leadership positions at Software AG/IDS Scheer and Accenture. Before that, he served as an active-duty and reserve officer in the German Armed Forces.