How to set up the Technical Governance – part 2: meta model
After creating the data models that are relevant for your technical governance, we will have a look at the meta model in this article. You will see the entities “come alive” in this activity, and the conversations with your stakeholders become less abstract and more “hands-on”.
What is a meta model?
While the data model shows the “what”, a meta model will show the relationships between the models and objects that will be configured in the tool – the “how”. It is good practice to create this meta model in a separate database (“Configuration DB”).
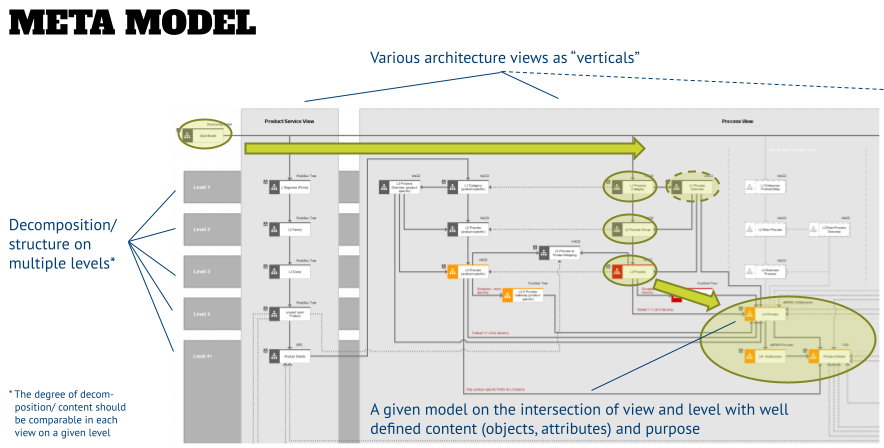
To create a meta model you need to find an agreement on which architecture views and how many levels you desire to have. An indication of this can be the decomposition that you created in the data modeling exercise, or by looking at the structure of your organization breakdown. The graphic below shows an example of a client meta model and how a user will be able to navigate from a central start model to a lower-level business process on level 4 that might have subprocesses and its details shown in additional separate models for each step of the process.

A meta model is the visual representation of “how things are wired up” when the configuration of the architecture tool will be done. This helps to communicate with stakeholders, and other programs that you want to build technical interfaces to. In the latter case you can derive requirements for levels based on the structure that they might be able to deliver (or require) for data exchange with their tool.
How to create a meta model?
In your tool, create a new model that allows you to assign any model type to an object – in ARIS this model is called “Structuring Model” and the objects in that model type (“Structuring Elements”) allow any model assignment. Do this in a new “Configuration” database, which will only contain the meta model and other config-relevant items, but no design or additional documentation. Those should go into the “Solution Architecture” database that also houses the data models.
- In that model create a matrix of views –the light gray verticals in the graphic above– and levels –the darker gray rows in the background.
- Now place objects on each intersection that represents a model type that needs to be further defined. Please note, that each of the objects has attributes where you should capture the objectives of this model on this intersection in the description, and the model type in the remarks.
- The latter is shown in the model, and for each identified model type, select one that you indicate with an asterisk (I typically take the first one of each type). The models assigned to this object will then be used to define the model attributes, such as model description, model status, author, approver, etc. A good practice is also to copy the objects with the asterisk in a second model as occurrences, so that you have all relevant models for model attribute configuration in one dedicated model.
Once you have the views and levels defined, connect the objects:
- For the click-through paths (for example, assignments between higher-level objects and the next level model) draw a directional solid line. This also shows if a user has to make a decision when navigating – in the example above at the level 4 product level a user can either navigate to the details of a lower-level product (e.g., who is responsible/uses this product), or to the first level of a product-oriented process view.
- To indicate the reuse of objects that are created in a specific view (and stored there) draw a dotted directional line. An example can be seen for the lower level process detail model (details of a single task) that has a few incoming lines in the graphic above, but many dotted incoming lines from org charts, application catalogs, or risk and control catalogs.
This will keep the architectural setup by view intact, and will allow a detailed permission deployment in the future, e.g., having only users from the IT organization update the application catalog, while business units can create process models that can use applications from the catalog.
Overall a meta model is very helpful in communicating “how things are wired up” and will be the foundation for future scripting work, as well as the configuration (see below).
Create the next level of models
Once you have a draft meta model, the next step is to create a level 2 model assigned to the each of the objects in the meta model. Within this model all objects and connections will be modeled using generic objects, such as “task”, “event” or “application”. This will prevent stakeholders to look at the content instead of the structure of a model.

Some guidance for modeling the level 2 meta models:
- Use generic objects. At this time you are looking for an occurrence of an object or connection in a model. It doesn’t matter what the content of this object is. Quite the opposite – if you have “real” content in your lower-level meta models, your stakeholders immediately will look at the content and tell you that you got the process steps or a technical application interface wrong in your model, and they have lost the focus (concentrating with objects and connections shall be configured later).
- Create connections and select the correct connection type if multiple connection types might be pre-configured in the tool’s Entire Method. You might have to create additional model snippets below the main model if you want to include additional connection types – for example, when you want to create the four RACI connection types (responsible, accountable, must be consulted, must be informed). The tools typically allow only one type of connection between two objects, so you need to create additional modeling snippets for the other connections. It does not matter if the model is not “pretty” after that, but it is important that the connection is defined in the database when it comes to creating a config file later.
- Reuse objects from other views, such as apps or roles, in your model to create a complete picture – but change those only in their correct view. You want to avoid having multiple objects of the same kind being configured differently, which will make the debugging of your configuration files significantly easier.
- Highlight objects that need to be configured. I typically use the first occurrence of an object type in its native view and put a light gray box behind it. This is the visual marker for later when the configuration shall be changed, so that you don’t have to hunt for the correct object. Unfortunately, not all tools allow to copy any object type into a “generic” model type, so you cannot create the convenient separate model that you created for the model attribute maintenance above.
- Maintain object attributes in the highlighted objects (and only there!). This includes attributes like “description”, or “remarks” but also specific attributes that you will need to create for interfaces or are used in special use cases like simulation. You do not have to put meaningful content into these attributes, a simple “x” will do the trick – it is important that you have a maintained attribute in your config database at this time.
- Create assignments from the objects in your lower-level meta models to other models according to the high-level meta model, so that you can navigate vertically and horizontally in your config database. Please also make sure that you use occurrences of events, for example, when you “wire up” the horizontal navigation of processes at level 4 for example.
These generic lower level meta models then can be used to discuss with stakeholders. During these conversations also identify their requirements for formatting (e.g. colors), and also if attributes shall be shown in the model (for example an indicator that shows up under certain conditions – i.e. an indicator that shows if a risk or control is related to a process step in a lower-level process. This information will be used later when creating a template in which you define the look and feel of your models.
Create examples to make things “real” for your stakeholders
After you have discussed the “generic” meta models with your stakeholders, create models with “real” content that can be used in training or communication material later. For this let the stakeholders point you to the subject matter experts for the different architecture views, and work with them to create meaningful content.
In an ideal scenario you can develop a story how you would walk new users, or representatives of other programs that you want to interface with, through the meta model that will make sense for them. Pick a generic example that everyone can relate to – “onboarding” or “purchasing” processes are well known by almost any user.

A leading practice is to have both assignments on the objects in your meta model – the “generic” models that include all objects, connections, attributes, etc. (for which I like to add a “- MM” at the end of the model name), and the “real” examples, for which I typically add an “- Ex” to the model name.
Once you have these two main steps –the meta model itself and the assigned model types– accomplished, review the results with your stakeholders and gather feedback. This will create a shared understanding, uncover the need for a method extension in the form of new symbols or attributes, and point out potential mismatches between tools (which will become requirements for future releases), as well as requirements for the template creation at a later point in time.
Similar to the Solution Architecture documentation I also recommend creating a “Configuration” presentation that walks stakeholders through the major areas of the meta model and includes links to the models in the Configuration DB.
Next step: create the configuration files for your tool
The last step in this series is then to use the information above and configure this in your architecture tool. Obviously this is different for every tool, and the last part of this series talks about how to change the method and create filters and templates for ARIS as an example.
Roland Woldt is a well-rounded executive with 25+ years of Business Transformation consulting and software development/system implementation experience, in addition to leadership positions within the German Armed Forces (11 years).
He has worked as Team Lead, Engagement/Program Manager, and Enterprise/Solution Architect for many projects. Within these projects, he was responsible for the full project life cycle, from shaping a solution and selling it, to setting up a methodological approach through design, implementation, and testing, up to the rollout of solutions.
In addition to this, Roland has managed consulting offerings during their lifecycle from the definition, delivery to update, and had revenue responsibility for them.
Roland has had many roles: VP of Global Consulting at iGrafx, Head of Software AG’s Global Process Mining CoE, Director in KPMG’s Advisory (running the EA offering for the US firm), and other leadership positions at Software AG/IDS Scheer and Accenture. Before that, he served as an active-duty and reserve officer in the German Armed Forces.